Monday, August 18, 2008
Merging Watir and FireWatir
We are planning to merge Watir and Firewatir. So from now on all the downloads for Firewatir shall be there on the OpenQA.


Wednesday, June 04, 2008
Use VB.NET user control as Active X (ocx) control in VB6
Writing post after long time. This seems to be a very common problem. When you are having a existing VB6 application that is going to be upgrading to VB.NET application but you need to go step by step. So most of new development is done using VB.NET and then you integrate that your VB6 application. There are two scenarios here:
1. You write business logic/data layer in VB.NET which is basically a ".dll" file. This file you can use in your VB6 code by using "regasm" for registering the DLL and creating "Type Library". Add this as reference to your project and use classes/methods and properties in your VB6 code.
2. You develop a user control or form in VB.NET and now you want to use in VB6. Now here lies the problem, VB6 only knows .OCX extensions for user control, it doesn't understand ".dll" extension for user controls. While searching on how this can be done without to much of effort I came across a really nice and easy solutions to this problem.
Interop Forms Toolkit provides solution for building VB.NET forms, controls and then using it easily in your VB6 code. It provides with excellent help on how to use the toolkit. Only thing what I found difficult was "How to deploy the application?"
Though there is help provided for that, I had lot of problems while deploying the application. I'll research more on this and will get back in my next post as in what are easy ways to deploy the application using this tool.
1. You write business logic/data layer in VB.NET which is basically a ".dll" file. This file you can use in your VB6 code by using "regasm" for registering the DLL and creating "Type Library". Add this as reference to your project and use classes/methods and properties in your VB6 code.
2. You develop a user control or form in VB.NET and now you want to use in VB6. Now here lies the problem, VB6 only knows .OCX extensions for user control, it doesn't understand ".dll" extension for user controls. While searching on how this can be done without to much of effort I came across a really nice and easy solutions to this problem.
Interop Forms Toolkit provides solution for building VB.NET forms, controls and then using it easily in your VB6 code. It provides with excellent help on how to use the toolkit. Only thing what I found difficult was "How to deploy the application?"
Though there is help provided for that, I had lot of problems while deploying the application. I'll research more on this and will get back in my next post as in what are easy ways to deploy the application using this tool.
Thursday, July 26, 2007
Firewatir 1.1 released
FireWatir 1.1 is released. New features are added to this release like:
1. Making it more compatible with Watir
2. XPI for Windows that show up in extensions list
3. Iterators for elements
4. Improved handling of javascript pop ups
5. Added code to show all objects in document or inside any element.
6. Add methods like show_forms, show_images, show_frames, show_links etc
7. Bug fixes
For more information on release please visit:
http://code.google.com/p/firewatir/wiki/ReleaseNotes
For downloading FireWatir and installation guide please visit:
http://code.google.com/p/firewatir/
1. Making it more compatible with Watir
2. XPI for Windows that show up in extensions list
3. Iterators for elements
4. Improved handling of javascript pop ups
5. Added code to show all objects in document or inside any element.
6. Add methods like show_forms, show_images, show_frames, show_links etc
7. Bug fixes
For more information on release please visit:
http://code.google.com/p/firewatir/wiki/ReleaseNotes
For downloading FireWatir and installation guide please visit:
http://code.google.com/p/firewatir/
Monday, June 18, 2007
Create pdf in .NET using PDFCreator
Long time no post, was busy with office work and most of the time was searching for an open source tool that reliably prints or creates pdf from any document. It should also have ability to merge the documents or pdfs together. Finally, I found great open source tool PDFCreator which lets you create pdf, merge pdf, automatically save them to a directory, set options via code etc etc. In this article we'll see how we can use PDFCreator for printing/creating pdfs. It uses GhostScript for creating PDF which is again distributed free under GPL license.
INSTALLING PDFCREATOR:
1. Download PDFCreator from sourceforge.net (http://sourceforge.net/projects/pdfcreator)
2. If you have already installed GhostScript go for installer which doesn’t have ghost script installer embedded else go for the installer that will install ghost script also.
3. Run the installer and install PDFCreator. You can use any mode while installing (standard or server) but the server mode needs more configuration so better go for standard mode.
4. Give the name of the printer as “PDFCreator”. You can use any name but this is the name that I have used in the code. So if you are using the code as it is then you need to give this name.
5. After installation a new printer will be installed on your machines.
6. You can use this printer from any document. Open the document and say print. Choose the printer created above and ask it to print.
USE PDFCREATOR IN CODE (C#):
In this code I'll be using Word Application to convert a word document to PDF document. Code will be in C# and application will be a console application. In this example we'll also see how to create a single pdf from multiple word documents (or any documents).
1. Create new console application in C#.
2. Add reference to PDFCreator and Word object.
3. Create new instance for PDFCreator and start using the code.
4. If printer is started successfully set the options for the printer.
5. Create new word application object and save currently active printer. This is done because while creating PDF PDFCreator (or whatever name you have given while installation) should be active. By saving the name of currently active printer we can set that back as active after creating PDF.
6. The above steps are common for either creating single pdf from single document or creating single pdf from multiple documents.
CREATE SINGLE PDF FROM SINGLE DOCUMENT
1. Open an existing word document.
2. Print out the document using ‘Printout’ method. As currently active printer is ‘PDFCreator’, word will use that printer for printing the document.
3. Wait for the job to get queue up in the PDFCreator. And start the printer (PDFCreator) and then wait for the job to get finished.
CREATE SINGLE PDF FROM MULTIPLE DOCUMENTS
1. Follow step 1 as described in section Creating single PDF from single document.
2. In step 2 instead of printing single document you can go from printing any number of documents. (Make sure you remember the count).
3. Now instead of waiting for one document. Wait for all the documents to get queued up and then use “combineAll()’ method of PDFCreator object to combine all the documents into single PDF.
CLOSING PRINTER AND WORD APPLICATION
POINTS OF INTEREST / GOTCHA
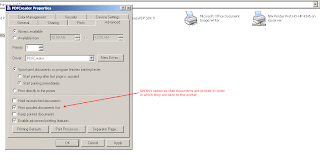
If you PDF printer settings is not according to the following diagram then the order in which the documents will get printed is not defined. This will be a problem in case of printing multiple documents to a single PDF where order is important.
INSTALLING PDFCREATOR:
1. Download PDFCreator from sourceforge.net (http://sourceforge.net/projects/pdfcreator)
2. If you have already installed GhostScript go for installer which doesn’t have ghost script installer embedded else go for the installer that will install ghost script also.
3. Run the installer and install PDFCreator. You can use any mode while installing (standard or server) but the server mode needs more configuration so better go for standard mode.
4. Give the name of the printer as “PDFCreator”. You can use any name but this is the name that I have used in the code. So if you are using the code as it is then you need to give this name.
5. After installation a new printer will be installed on your machines.
6. You can use this printer from any document. Open the document and say print. Choose the printer created above and ask it to print.
USE PDFCREATOR IN CODE (C#):
In this code I'll be using Word Application to convert a word document to PDF document. Code will be in C# and application will be a console application. In this example we'll also see how to create a single pdf from multiple word documents (or any documents).
1. Create new console application in C#.
2. Add reference to PDFCreator and Word object.
3. Create new instance for PDFCreator and start using the code.
clsPDFCreator creator = new clsPDFCreator();
string parameters = "/NoProcessingAtStartup";
if(!creator.cStart(parameters, false))
{
Console.WriteLine("Unable to start PDFCreator.");
}
4. If printer is started successfully set the options for the printer.
// Set parameters for saving the generating pdf automatically to a directory.
// Use auto save functionality.
opt.UseAutosave = 1;
// Use directory for saving the file.
opt.UseAutosaveDirectory = 1;
// Name of the output directory.
opt.AutosaveDirectory = @"c:\";
// Format in which file is to be saved. 0 if for pdf.
opt.AutosaveFormat = 0;
// Name of the output file name.
opt.AutosaveFilename = [Name of output file];
creator.cOptions = opt;
creator.cClearCache();
5. Create new word application object and save currently active printer. This is done because while creating PDF PDFCreator (or whatever name you have given while installation) should be active. By saving the name of currently active printer we can set that back as active after creating PDF.
// Save currently active printer.
string defaultPrinter = creator.cDefaultPrinter;
// Create new instance of word application.
ApplicationClass wordapp;
wordapp = new ApplicationClass();
Document worddoc = null;
// Set pdf creator as active printer. Name should be same as you gave while installation.
wordapp.ActivePrinter = "PDFCreator";
6. The above steps are common for either creating single pdf from single document or creating single pdf from multiple documents.
CREATE SINGLE PDF FROM SINGLE DOCUMENT
1. Open an existing word document.
Object missingValue = Type.Missing;
Object docName = [Full Path to your document];
worddoc = wordapp.Documents.Open(ref docName, ref missingValue, ref missingValue, ref missingValue, ref missingValue, ref missingValue, ref missingValue, ref missingValue, ref missingValue, ref missingValue, ref missingValue, ref missingValue, ref missingValue, ref missingValue, ref missingValue,ref missingValue);
2. Print out the document using ‘Printout’ method. As currently active printer is ‘PDFCreator’, word will use that printer for printing the document.
Object false_object = false;
Object missingValue = Type.Missing;
Object background = true;
Object append = true;
Object range = Microsoft.Office.Interop.Word.WdPrintOutRange.wdPrintAllDocument;
Object outputFileName = Type.Missing;
Object from = Type.Missing;
Object to = Type.Missing;
Object item = Microsoft.Office.Interop.Word.WdPrintOutItem.wdPrintDocumentContent;
Object copies = 1;
Object pages = Type.Missing;
Object pageType = Microsoft.Office.Interop.Word.WdPrintOutPages.wdPrintAllPages;
Object printToFile = false;
Object collate = Type.Missing;
Object fileName = Type.Missing;
Object activePrinterMacGX = Type.Missing;
Object manualDuplexPrint = Type.Missing;
Object printZoomColumn = Type.Missing;
Object printZoomRow = Type.Missing;
Object printZoomPaperWidth = Type.Missing;
Object printZoomPaperHeight = Type.Missing;
wordapp.PrintOut(ref background, ref append, ref range, ref outputFileName, ref from, ref to, ref item, ref copies, ref pages, ref pageType, ref printToFile, ref collate, ref fileName, ref activePrinterMacGX, ref manualDuplexPrint, ref printZoomColumn, ref printZoomRow, ref printZoomPaperWidth, ref printZoomPaperHeight);
3. Wait for the job to get queue up in the PDFCreator. And start the printer (PDFCreator) and then wait for the job to get finished.
// Wait till doc gets queued up.
while(creator.cCountOfPrintjobs != 1);
// Start the printer.
creator.cPrinterStop = false;
// Wait till all doc get converted to pdf.
while(creator.cCountOfPrintjobs != 0);
CREATE SINGLE PDF FROM MULTIPLE DOCUMENTS
1. Follow step 1 as described in section Creating single PDF from single document.
2. In step 2 instead of printing single document you can go from printing any number of documents. (Make sure you remember the count).
3. Now instead of waiting for one document. Wait for all the documents to get queued up and then use “combineAll()’ method of PDFCreator object to combine all the documents into single PDF.
// Wait till doc gets queued up.
while(creator.cCountOfPrintjobs != [Your COUNT of documents printed]);
// Tell PDFCreator to combine all the documents.
creator.cCombineAll();
// Start the printer.
creator.cPrinterStop = false;
// Wait till all doc get converted to pdf.
while(creator.cCountOfPrintjobs != 0);
CLOSING PRINTER AND WORD APPLICATION
// Close all the opened documents.
foreach(Document doc in wordapp.Documents)
{
doc.Close(ref false_object, ref missingValue, ref missingValue);
}
// Stop the printer.
creator.cPrinterStop = true;
// Set back the default printer.
wordapp.ActivePrinter = defaultPrinter;
wordapp.Quit(ref false_object, ref missingValue, ref missingValue);
// Close the printer
creator.cClose();
creator = null;
POINTS OF INTEREST / GOTCHA
If you PDF printer settings is not according to the following diagram then the order in which the documents will get printed is not defined. This will be a problem in case of printing multiple documents to a single PDF where order is important.

Thursday, April 19, 2007
Firewatir 1.0.2 released
FireWatir 1.0.2 is released. New features are added to this release like:
1. Making it more compatible with Watir
2. XPI's for Linux and Mac
3. Iterators for elements
4. Bug fixes
For more information on release please visit:
http://code.google.com/p/firewatir/wiki/ReleaseNotes
For downloading FireWatir and installation guide please visit:
http://code.google.com/p/firewatir/
1. Making it more compatible with Watir
2. XPI's for Linux and Mac
3. Iterators for elements
4. Bug fixes
For more information on release please visit:
http://code.google.com/p/firewatir/wiki/ReleaseNotes
For downloading FireWatir and installation guide please visit:
http://code.google.com/p/firewatir/
Tuesday, February 27, 2007
Flush Socket in .NET or C#
Today, I faced a problem regarding synchronizing TCP/IP Client with TCP/IP server.
The problem was, client sends data and waits for acknowledgment. Server listens for data and when it gets data, it sends acknowledgment to the client and start listening for data again. Now when server starts listening for data again it gets old data i.e. it was not getting blocked on the read() function which it should, as client hasn't send any more data.
So, the problem was that the data was not being flushed. I searched for Flush method in System.Net.Sockets.Socket class but it was not there. There was a suggestion like:
1. Use the SetSocketOption function and set the value of ReceiveBuffer option to 0. It didn't work. Though the recivebuffer length was 0, the data was still being buffered.
2. Use the IOControl function to set the value for Flush option. But you won't find the integer value for Flush Option (atleast I was not able to)
The solution is, use NetworkStream class. You create a new stream using socket and then you create StreamReader and StreamWrite object using NetworkStream object
NetworkStream stream = new NetworkStream(socket);
StreamReader sr = new StreamReader(stream);
StreamWriter sw = new StreamWriter(stream);
Then, use Flush() method of StreamWriter to flush the data. You can also set the property called AutoFlush of StreamWriter to automatically flush the stream after write operation. But Flush() method is more reliable.
The problem was, client sends data and waits for acknowledgment. Server listens for data and when it gets data, it sends acknowledgment to the client and start listening for data again. Now when server starts listening for data again it gets old data i.e. it was not getting blocked on the read() function which it should, as client hasn't send any more data.
So, the problem was that the data was not being flushed. I searched for Flush method in System.Net.Sockets.Socket class but it was not there. There was a suggestion like:
1. Use the SetSocketOption function and set the value of ReceiveBuffer option to 0. It didn't work. Though the recivebuffer length was 0, the data was still being buffered.
2. Use the IOControl function to set the value for Flush option. But you won't find the integer value for Flush Option (atleast I was not able to)
The solution is, use NetworkStream class. You create a new stream using socket and then you create StreamReader and StreamWrite object using NetworkStream object
NetworkStream stream = new NetworkStream(socket);
StreamReader sr = new StreamReader(stream);
StreamWriter sw = new StreamWriter(stream);
Then, use Flush() method of StreamWriter to flush the data. You can also set the property called AutoFlush of StreamWriter to automatically flush the stream after write operation. But Flush() method is more reliable.
Thursday, January 18, 2007
FireWatir 1.0.1 released
FireWatir 1.0.1 is released. New features are added to this release like:
1. Cross platfrom support.
2. Frames and forms support.
3. Starting Firefox manually (currently works only on windows).
For more information on release please visit:
http://code.google.com/p/firewatir/wiki/ReleaseNotes
For downloading FireWatir and installation guide please visit:
http://code.google.com/p/firewatir/
1. Cross platfrom support.
2. Frames and forms support.
3. Starting Firefox manually (currently works only on windows).
For more information on release please visit:
http://code.google.com/p/firewatir/wiki/ReleaseNotes
For downloading FireWatir and installation guide please visit:
http://code.google.com/p/firewatir/
Wednesday, December 27, 2006
Log4r - Usage and Examples
Log4r is a library used for logging in Ruby programs. It can be used for logging to any kind of destination and with varying degrees of importance (levels). Log4r supports custom level names (i.e. you can have as many levels as you can instead of using built-in levels), logger inheritance, multiple output destination, custom formatting of messages, XML and YAML configuration etc.
In this article we'll see how to use Log4r in Ruby programs.
1. Simple logging using Log4r.
The below code shows how to log simply to the Standard output using Log4r. It doesn't use any formatting or any custom levels.
The "do_log" method logs the messages at different levels. For logging you don't have call to a function that takes 'log level' and message as argument. Instead in Log4r each level is a method itself which takes message as argument and then logs the message depending upon the level that is set for the logger.
You can also check the logging level before logging a message using "query methods" like debug?, info? etc. You can use them like this:
The above code will first check that if current logger can log the messages at debug level or not. The method with level name and question mark is called "query method". It will return true or false depending upon the level set for the logger.
2. Logging using Formatter and Outputter:
Above example used Standard output as destination for the logging. It also didn't use any Formatter for formatting the message. In this section we'll see what all destinations we can use for logging (with example of one of them) and what all formatting we can use (with example of one of them).
Log4r provides the following destination for logging:
1. IOOutputter -> For logging to any IO object
2. StdoutOutputter -> For logging to standard output IO i.e. $stdout
3. StderrOutputter -> For logging to standard error IO i.e. $stderr
4. FileOutputter -> For logging to file
5. RollingFileOutputter -> For logging to file and split the file as it grows
6. SyslogOutputter -> For logging to system log
7. EmailOutputter -> For emailing the logs
8. RemoteOutputter -> For remote logging
You can attach any number of outputter to a logger using 'outputters' property or by using 'add' method of logger object. Suppose you have created four outputters out1 to out4, you can add them to logger 'mylog' as follows:
Log4r provides several formatters for formatting the message before logging it. It also provides a custom formatter called 'PatternFormatter' which is very flexible and powerful.
Log4r provides the following formatters:
1. BasicFormatter -> This is default formatter. Logs the message as it is.
2. PatternFormatter -> Most powerful and flexible formatter for custom formatting.
3. SimpleFormatter -> Adds log level and logger name to the message. Used only for strings. Doesn't inspect objects.
4. ObjectFormatter -> Inspect the objects and logs them as IRB(Interactive Ruby) does. Doesn't inspect strings.
5. NullFormatter -> Does nothing :)
Following code sample uses 'FileOutputter' alongwith 'PatternFormatter' for logging the message to log file.
FileOuputter.new creates new instance of FileOutputter. First argument is name of the outputter, second is hash containing name of the file and whether to trunc the file while opening the file or not. For more information on outputters refer to this link.
PatternFormatter.new creates a new pattern formatter. It takes hash as input specifying the format for the message. If you are using date in the message you can optionally give date_pattern also. If no date_pattern is specified default date time patter will be chosen, which will log the date like this:
To specify custom date formatting use the following code:
For more information of "date_pattern" directive (%a, %d etc) refer to this link. For more information about "pattern" directives (%l, %m) refer to this link.
In this article we'll see how to use Log4r in Ruby programs.
1. Simple logging using Log4r.
The below code shows how to log simply to the Standard output using Log4r. It doesn't use any formatting or any custom levels.
require 'log4r'
include Log4r
# create a logger named 'mylog' that logs to stdout
mylog = Logger.new 'mylog'
# You can use any Outputter here.
mylog.outputters = Outputter.stdout
# log level order is DEBUG < INFO < WARN < ERROR < FATAL
mylog.level = Log4r::INFO
# Now we can log.
def do_log(log)
log.debug "This is a message with level DEBUG"
log.info "This is a message with level INFO"
log.warn "This is a message with level WARN"
log.error "This is a message with level ERROR"
log.fatal "This is a message with level FATAL"
end
do_log(mylog)
The "do_log" method logs the messages at different levels. For logging you don't have call to a function that takes 'log level' and message as argument. Instead in Log4r each level is a method itself which takes message as argument and then logs the message depending upon the level that is set for the logger.
You can also check the logging level before logging a message using "query methods" like debug?, info? etc. You can use them like this:
if(log.debug?)
log.debug "debug message"
end
The above code will first check that if current logger can log the messages at debug level or not. The method with level name and question mark is called "query method". It will return true or false depending upon the level set for the logger.
2. Logging using Formatter and Outputter:
Above example used Standard output as destination for the logging. It also didn't use any Formatter for formatting the message. In this section we'll see what all destinations we can use for logging (with example of one of them) and what all formatting we can use (with example of one of them).
Log4r provides the following destination for logging:
1. IOOutputter -> For logging to any IO object
2. StdoutOutputter -> For logging to standard output IO i.e. $stdout
3. StderrOutputter -> For logging to standard error IO i.e. $stderr
4. FileOutputter -> For logging to file
5. RollingFileOutputter -> For logging to file and split the file as it grows
6. SyslogOutputter -> For logging to system log
7. EmailOutputter -> For emailing the logs
8. RemoteOutputter -> For remote logging
You can attach any number of outputter to a logger using 'outputters' property or by using 'add' method of logger object. Suppose you have created four outputters out1 to out4, you can add them to logger 'mylog' as follows:
mylog.outputters = out1, out2
mylog.add(out3, out4)
Log4r provides several formatters for formatting the message before logging it. It also provides a custom formatter called 'PatternFormatter' which is very flexible and powerful.
Log4r provides the following formatters:
1. BasicFormatter -> This is default formatter. Logs the message as it is.
2. PatternFormatter -> Most powerful and flexible formatter for custom formatting.
3. SimpleFormatter -> Adds log level and logger name to the message. Used only for strings. Doesn't inspect objects.
4. ObjectFormatter -> Inspect the objects and logs them as IRB(Interactive Ruby) does. Doesn't inspect strings.
5. NullFormatter -> Does nothing :)
Following code sample uses 'FileOutputter' alongwith 'PatternFormatter' for logging the message to log file.
require 'log4r'
include Log4r
# create a logger named 'mylog' that logs to stdout
mylog = Logger.new 'mylog'
# You can use any Outputter here.
mylog.outputters = Outputter.stdout
# Open a new file logger and ask him not to truncate the file before opening.
# FileOutputter.new(nameofoutputter, Hash containing(filename, trunc))
file = FileOutputter.new('fileOutputter', :filename => 'log',:trunc => false)
# You can add as many outputters you want. You can add them using reference
# or by name specified while creating
mylog.add(file)
# or mylog.add(fileOutputter) : name we have given.
# As I have set my logging level to ERROR. only messages greater than or
# equal to this level will show. Order is
# DEBUG < INFO < WARN < ERROR < FATAL
mylog.level = Log4r::INFO
# specify the format for the message.
format = PatternFormatter.new(:pattern => "[%l] %d :: %m")
# Add formatter to outputter not to logger.
# So its like this : you add outputter to logger, and add formattters to outputters.
# As we haven't added this formatter to outputter we created to log messages at
# STDOUT. Log messages at stdout will be simple
# but the log messages in file will be formatted
file.formatter = format
# Now we can log.
def do_log(log)
log.debug "This is a message with level DEBUG"
log.info "This is a message with level INFO"
log.warn "This is a message with level WARN"
log.error "This is a message with level ERROR"
log.fatal "This is a message with level FATAL"
end
do_log(mylog)
FileOuputter.new creates new instance of FileOutputter. First argument is name of the outputter, second is hash containing name of the file and whether to trunc the file while opening the file or not. For more information on outputters refer to this link.
PatternFormatter.new creates a new pattern formatter. It takes hash as input specifying the format for the message. If you are using date in the message you can optionally give date_pattern also. If no date_pattern is specified default date time patter will be chosen, which will log the date like this:
2006-12-21 13:15:50
To specify custom date formatting use the following code:
format = PatternFormatter.new(:pattern => "[%l] %d :: %m",
:date_pattern => "%a %d %b %H:%M %p %Y")
For more information of "date_pattern" directive (%a, %d etc) refer to this link. For more information about "pattern" directives (%l, %m) refer to this link.
Monday, December 18, 2006
FireWatir: How to?
FireWatir is a web application testing tool written using Ruby language. It is used for testing web application functionality on Firefox browser. It is written keeping 'WATiR' in mind so that scripts written for testing the application on IE using WATiR can be used with minimal/no changes, to test the application on Firefox.
How its different from WATiR?
The main difference between WATiR and FireWatir lies in the mechanism, which drives the browser, to test a web application.
WATiR uses the COM object of IE browser exposed by windows. It interacts with the COM objects for doing any action on HTML elements, of a page, that is displayed using IE(i.e. HTML elements that are supported by WATiR). Interacting with the browser in this way restricts the usage of WATiR on Windows only.
For Firefox there is no COM object that is exposed. So, tried using XPCOM to interact with the browser. But it didn't work out as you need to compile XPCOM with Firefox browser. So it was not feasible for every user of FireWatir to first compile the source and then use the tool. So, we explored more and found an extension called JSSh. JSSh is a TCP/IP JavaScript Shell Server for Mozilla that allows other programs like Telnet to make connections to the running Mozilla process. This was what we needed to drive the Firefox browser. The ruby calls are converted to corresponding JavaScript code and send to JSSh via a socket. JSSh executes that JavaScript code on the browser and returns the result.
So, finally the test scripts when executed on IE or FireFox will be executed in same manner; the working is transparent to users. Though, FireWatir is implemented using socket for interaction with the browser, there is not much of a difference in execution speed of FireWatir as comparted to WATiR.
How to install FireWatir?
You can get the latest gem and JSSh extension for Windows from http://code.google.com/p/firwatir. FireWatir is still not tested on Mac or Linux, but it should work on any platform as we are not using any Windows specific component.
Install the JSSh extension by opening the extension file in the browser. The extension will not show up in the extension list. So to check if the extension is installed properly, restart the Firefox from command prompt with '-jssh' as command line argument. For e.g.: In windows restart it using 'c:\Program Files\Mozilla Firefox\Firefox.exe -jssh' assuming that you have installed Firefox in 'c:\Program Files\Mozilla Firefox' directory. After the browser is started telnet to port 9997. the response should be:
Welcome to the Mozilla JavaScript Shell!
JSSh command shell will open with '>' as shell prompt character. If this shows up then JSSh extension is installed properly.
Install the FireWatir gem using command 'gem install [firewatir gem name]'. This will install FireWatir 1.0 on your machine. Now go to the FireWatir installation directory in the gems. For e.g. go to 'c:\ruby\lib\ruby\gems\1.8\gems' assuming that you are on windows platform and have installed 'ruby' version 1.8 in 'c:\ruby\' directory. Check for 'firewatir-1.0-mswin32 folder (assuming you have installed gem for windows). Existence of that folder indicates correct installation. Now go to 'unittests' directory and run file 'mozilla_all_tests.rb' (make sure you have started Firefox as said above with -jssh option before running the test cases). This file will run all the unittests without any failure or errors. In case you get any errors or failures refer to section 'TroubleShooting'. In case the error is not resolved add it to the issue tracking system at 'http://code.google.com/p/firewatir.
How to use?
Go to the 'unittests' directory in the gems folder. Refer to the unittest cases on how to access the element? How to use them? What properties they expose? etc etc..
Which Firefox versions are supported?
FireWatir is tested on Firefox version 1.5, 1.5.0.7 and 2.0. It should work with all Firefox version 1.5 and above. It may or may not work with versions less that 1.5
TroubleShooting
1. Currently you need to start Firefox manually from command prompt using '-jssh' as command line argument before running any FireWatir script or unit tests.
2. Check if JSSh is installed correctly by connecting to port 9997 using Telnet (telnet localhost 9997 if you are telnet-ing from the same machine on which your Firefox instance is running, or telnet testhost 9997 where testhost is the hostname of the remote machine on which FireFox is running).
3. In case 'attach_new_browser' test fails. Make sure you run this test alone using 'ruby attach_new_browser'. Make sure that Firefox doesn't block the pop up. Also make sure that you have settings to open the link in new window instead of new tab.
4. In case you face any other problems or you have some comments/suggestions/queries mail at 'angrez@gmail.com' or at 'amit.garde@gmail.com'
How its different from WATiR?
The main difference between WATiR and FireWatir lies in the mechanism, which drives the browser, to test a web application.
WATiR uses the COM object of IE browser exposed by windows. It interacts with the COM objects for doing any action on HTML elements, of a page, that is displayed using IE(i.e. HTML elements that are supported by WATiR). Interacting with the browser in this way restricts the usage of WATiR on Windows only.
For Firefox there is no COM object that is exposed. So, tried using XPCOM to interact with the browser. But it didn't work out as you need to compile XPCOM with Firefox browser. So it was not feasible for every user of FireWatir to first compile the source and then use the tool. So, we explored more and found an extension called JSSh. JSSh is a TCP/IP JavaScript Shell Server for Mozilla that allows other programs like Telnet to make connections to the running Mozilla process. This was what we needed to drive the Firefox browser. The ruby calls are converted to corresponding JavaScript code and send to JSSh via a socket. JSSh executes that JavaScript code on the browser and returns the result.
So, finally the test scripts when executed on IE or FireFox will be executed in same manner; the working is transparent to users. Though, FireWatir is implemented using socket for interaction with the browser, there is not much of a difference in execution speed of FireWatir as comparted to WATiR.
How to install FireWatir?
You can get the latest gem and JSSh extension for Windows from http://code.google.com/p/firwatir. FireWatir is still not tested on Mac or Linux, but it should work on any platform as we are not using any Windows specific component.
Install the JSSh extension by opening the extension file in the browser. The extension will not show up in the extension list. So to check if the extension is installed properly, restart the Firefox from command prompt with '-jssh' as command line argument. For e.g.: In windows restart it using 'c:\Program Files\Mozilla Firefox\Firefox.exe -jssh' assuming that you have installed Firefox in 'c:\Program Files\Mozilla Firefox' directory. After the browser is started telnet to port 9997. the response should be:
Welcome to the Mozilla JavaScript Shell!
JSSh command shell will open with '>' as shell prompt character. If this shows up then JSSh extension is installed properly.
Install the FireWatir gem using command 'gem install [firewatir gem name]'. This will install FireWatir 1.0 on your machine. Now go to the FireWatir installation directory in the gems. For e.g. go to 'c:\ruby\lib\ruby\gems\1.8\gems' assuming that you are on windows platform and have installed 'ruby' version 1.8 in 'c:\ruby\' directory. Check for 'firewatir-1.0-mswin32 folder (assuming you have installed gem for windows). Existence of that folder indicates correct installation. Now go to 'unittests' directory and run file 'mozilla_all_tests.rb' (make sure you have started Firefox as said above with -jssh option before running the test cases). This file will run all the unittests without any failure or errors. In case you get any errors or failures refer to section 'TroubleShooting'. In case the error is not resolved add it to the issue tracking system at 'http://code.google.com/p/firewatir.
How to use?
Go to the 'unittests' directory in the gems folder. Refer to the unittest cases on how to access the element? How to use them? What properties they expose? etc etc..
Which Firefox versions are supported?
FireWatir is tested on Firefox version 1.5, 1.5.0.7 and 2.0. It should work with all Firefox version 1.5 and above. It may or may not work with versions less that 1.5
TroubleShooting
1. Currently you need to start Firefox manually from command prompt using '-jssh' as command line argument before running any FireWatir script or unit tests.
2. Check if JSSh is installed correctly by connecting to port 9997 using Telnet (telnet localhost 9997 if you are telnet-ing from the same machine on which your Firefox instance is running, or telnet testhost 9997 where testhost is the hostname of the remote machine on which FireFox is running).
3. In case 'attach_new_browser' test fails. Make sure you run this test alone using 'ruby attach_new_browser'. Make sure that Firefox doesn't block the pop up. Also make sure that you have settings to open the link in new window instead of new tab.
4. In case you face any other problems or you have some comments/suggestions/queries mail at 'angrez@gmail.com' or at 'amit.garde@gmail.com'
Tuesday, December 12, 2006
Building Firefox on Windows
Building Firefox on Windows is a bit tricky. Though, the instructions on Mozilla developer site:
http://developer.mozilla.org/en/docs/Windows_Build_Prerequisites_on_the_1.7_and_1.8_Branches
are clear; there are more steps that you need to follow to build Firefox successfully. Make sure you
1. Use make 3.80 and not 3.81. If you install cygwin it will install make 3.81 by default which will break the build. You can get make 3.80 here.
2. Rename /cygwin/bin/link.exe so that correct linker is used.
3. Delete all "config.cache" files. Why? Explained below.
4. Have source under directory strictly named as "mozilla". Click here for more discussion on this.
5. If you get error like this:
client.mk:359: source: No such file or directory
client.mk:359: code/mozilla/build/unix/modules.mk: No such file or directory
make: ** No rule to make target `code/mozilla/build/unix/modules.mk'. Stop here.
then, make sure that the mozilla source code is in a directory that doesn't have a space in the name i.e. it should be like this 'Firefox source code'. The directory name should not contains spaces.
If you have build Firefox before and you have changed your configuration i.e. the location of tools that you used to build Firefox, make sure you clear all "config.cache" files. These files caches the location from where the tools are used; so when you rebuild the Firefox, instead of fetching the location from your config file it uses the location in "config.cache" file, which may contain stale location.
So to summarize:
1. Use make 3.80
2. Clean all "config.cache" files.
3. Rename cygwin link.exe
4. Have source inside directory strictly named as "mozilla"
5. The name of the directory containing source code should not have spaces in it.
http://developer.mozilla.org/en/docs/Windows_Build_Prerequisites_on_the_1.7_and_1.8_Branches
are clear; there are more steps that you need to follow to build Firefox successfully. Make sure you
1. Use make 3.80 and not 3.81. If you install cygwin it will install make 3.81 by default which will break the build. You can get make 3.80 here.
2. Rename /cygwin/bin/link.exe so that correct linker is used.
3. Delete all "config.cache" files. Why? Explained below.
4. Have source under directory strictly named as "mozilla". Click here for more discussion on this.
5. If you get error like this:
client.mk:359: source: No such file or directory
client.mk:359: code/mozilla/build/unix/modules.mk: No such file or directory
make: ** No rule to make target `code/mozilla/build/unix/modules.mk'. Stop here.
then, make sure that the mozilla source code is in a directory that doesn't have a space in the name i.e. it should be like this 'Firefox source code'. The directory name should not contains spaces.
If you have build Firefox before and you have changed your configuration i.e. the location of tools that you used to build Firefox, make sure you clear all "config.cache" files. These files caches the location from where the tools are used; so when you rebuild the Firefox, instead of fetching the location from your config file it uses the location in "config.cache" file, which may contain stale location.
So to summarize:
1. Use make 3.80
2. Clean all "config.cache" files.
3. Rename cygwin link.exe
4. Have source inside directory strictly named as "mozilla"
5. The name of the directory containing source code should not have spaces in it.
Monday, November 27, 2006
barCamp Pune II
After successful barCamp Pune here comes second barCamp in Pune. Its on 16 - 17 Decemeber.
Please visit the following link for details like presentation, venue and of course of mentioning your T-shirt size :) if you are attending
http://barcamp.org/BarCampPune2
Please visit the following link for details like presentation, venue and of course of mentioning your T-shirt size :) if you are attending
http://barcamp.org/BarCampPune2
barCamp Bangalore
After barCamp Delhi and barCamp Pune here comes barCamp Bangalore. Its on 2 - 3 Dec 2006.
Refer to the following link for more details on Presentations, Topics, Venue etc.
http://www.barcampbangalore.org/
Refer to the following link for more details on Presentations, Topics, Venue etc.
http://www.barcampbangalore.org/
Wednesday, November 22, 2006
Executing ruby scripts without Ruby installation
RubyScript2Exe is an interesting project that helps you to run ruby scripts on a machine that doesn't have Ruby installed on it. This projects creates standalone applications for Windows, Mac and Linux which can than be executed.
It collects all the files that are required to run the script on other machine: the Ruby script, Ruby interpreter and the Ruby run time library. Because these files are gathered from the local installation RubyScript2Exe creates an executable for the platform it run's on. No cross compile.
For more information checkout the RubyScript2Exe project.
It collects all the files that are required to run the script on other machine: the Ruby script, Ruby interpreter and the Ruby run time library. Because these files are gathered from the local installation RubyScript2Exe creates an executable for the platform it run's on. No cross compile.
For more information checkout the RubyScript2Exe project.
Friday, November 10, 2006
Using reflection in Ruby
Reflection in Ruby is a great way of doing the things at runtime. Sometimes you need to create an instance of class depending upon the parameter passed to a function. This parameter could be the name of the class to be created.
One way to do this is to write conditional loops and create the object. But if there are too many classes then this would become messy. Here comes reflection to rescue.
In Ruby using reflection you can get the following information:
1, What all class currently exists?
2. Their methods information
3. Their class hierarchy and lot more
Let consider the above problem and try to find out the solution using Reflection.
Ruby provide a module called "ObjectSpace" that lets you to use reflection and see all the above mentioned information.
so if you say
It will print all living, nonimmediate objects in Ruby process.
If you specify the type of objects that you want then you can specify it as option to each_object method. So,
will print all the classes that are there in the Ruby process.
So now the above problem becomes simple.
Iterate over all the classes compare their name. If name matches then create object and execute whichever function you like.
So, the code looks like
Once you get the object you can use any method of that object. For e.g. you can use superclass method to get the name of the parent class and so on and can build complete hierarchy dynamically.
You can get the information about methods of a given class using methods like private_methods(), protected_methods() which are defined in Object class which is base class for each object.
Reflection is great thing but there is also some performance hit when you use Reflection.
Happy programming !!!
One way to do this is to write conditional loops and create the object. But if there are too many classes then this would become messy. Here comes reflection to rescue.
In Ruby using reflection you can get the following information:
1, What all class currently exists?
2. Their methods information
3. Their class hierarchy and lot more
Let consider the above problem and try to find out the solution using Reflection.
Ruby provide a module called "ObjectSpace" that lets you to use reflection and see all the above mentioned information.
so if you say
ObjectSpace.each_object { |x| puts x }
It will print all living, nonimmediate objects in Ruby process.
If you specify the type of objects that you want then you can specify it as option to each_object method. So,
ObjectSpace.each_object(Class) { |x| puts x}
will print all the classes that are there in the Ruby process.
So now the above problem becomes simple.
Iterate over all the classes compare their name. If name matches then create object and execute whichever function you like.
So, the code looks like
class ClassFromString
@@counter = 0
def initialize
@@counter += 1
end
def getCounterValue
puts @@counter
end
end
def createClassFromString(classname)
ObjectSpace.each_object(Class) do |x|
if x.name == classname
object = x.new
object.getCounterValue
object = x.new
object.getCounterValue
end
end
end
createClassFromString("ClassFromString")
Once you get the object you can use any method of that object. For e.g. you can use superclass method to get the name of the parent class and so on and can build complete hierarchy dynamically.
You can get the information about methods of a given class using methods like private_methods(), protected_methods() which are defined in Object class which is base class for each object.
Reflection is great thing but there is also some performance hit when you use Reflection.
Happy programming !!!
Monday, October 30, 2006
Getting HTML generated by any control in ASP.NET
Sometimes situation arises in ASP.NET where you want to get the HTML that will be generated by the control without actually rendering the page. For e.g.: When getting the result from an AJAX call, you want to get the HTML generated by say Datagrid, so that you can directly replace the contents of the caller page.
In ASP.NET you can get the HTML of any control by creating a new instance of StringWriter. Using this instance of StringWriter create a new instance of HtmlTextWriter and then rendering the control to this HtmlTextWriter by using RenderControl() method. This method is defined in Control class; therefore every control will have this method. After rendering the control get the HTML from the StringWriter using ToString() method.
Code(C#) is as below:
If you are rendering a Datagrid or any other control that has a textbox with "runat='server'" tag then this will not work. Because for every textbow with "runat='server'" tag you need to have a "form" with "runat='server'" tag. So if your textbox in Datagrid is a read-only textbox then better replace it with "label" so that the HTML can be rendered correctly.
In ASP.NET you can get the HTML of any control by creating a new instance of StringWriter. Using this instance of StringWriter create a new instance of HtmlTextWriter and then rendering the control to this HtmlTextWriter by using RenderControl() method. This method is defined in Control class; therefore every control will have this method. After rendering the control get the HTML from the StringWriter using ToString() method.
Code(C#) is as below:
System.IO.StringWriter stringWriter = new System.IO.StringWriter();
HtmlTextWriter newHtmlWriter = new System.Web.UI.HtmlTextWriter(stringWriter);
yourControlId.RenderControl(newHtmlWriter);
string output = stringWriter.ToString();
If you are rendering a Datagrid or any other control that has a textbox with "runat='server'" tag then this will not work. Because for every textbow with "runat='server'" tag you need to have a "form" with "runat='server'" tag. So if your textbox in Datagrid is a read-only textbox then better replace it with "label" so that the HTML can be rendered correctly.
Changing innerHTML of table row
Few days ago, I got stuck while replacing the innerHTML of a table row with the results from an AJAX call. It happened that IE doesn't support the replacement of contents of a table row, while Firefox and Mozilla allows it.
Googling on the problem, I found that for IE you need to remove all the cells using deleteCell() method. Then create new cell using insertCell() method and then replace the innerHTML of this newly added cell.
So, for replacing the contents of Table in IE you need to iterate over the rows and cells and then replace the content of each cell individually.
For more info:
http://msdn.microsoft.com/workshop/author/tables/buildtables.asp
Googling on the problem, I found that for IE you need to remove all the cells using deleteCell() method. Then create new cell using insertCell() method and then replace the innerHTML of this newly added cell.
So, for replacing the contents of Table in IE you need to iterate over the rows and cells and then replace the content of each cell individually.
For more info:
http://msdn.microsoft.com/workshop/author/tables/buildtables.asp
Monday, July 31, 2006
Recorder for WATiR
Scott Hanselman and Rutger Smit, improved and re-released the original WatirMaker with new name WatirRecorder++. Its a Windows Application that compiles and runs on .NET version 1.1. So to run this recorder you need to have .NET framework 1.1 installed on your machine. Upgraded version for .NET platform 2.0 will be released soon by the authors.
You can download the tool here.
Also check out Ruby version of WatirMaker.
You can download the tool here.
Also check out Ruby version of WatirMaker.
Tuesday, June 06, 2006
XPath and WATiR
WATiR provides very simple API's for functional testing an Web Application. With even limited scripting experience with Ruby you'll be able to create scripts to test your application. It provides API's for accessing almost all common elements on an HTML page. It allows you to access elements on the basis of some pre-defined attributes.
Now, there were few things that were lacking:
1. What if you have a element which you can't access using those pre-defined attributes?
2. What if there is no API for a particular HTML element?
3. What if you want to access some element depeding upon some other element? For e.g.: Accessing which has a image with some pre-defined "src" attribute.
The solution to all above problems is using XPATH to access these elements. XPATH query is a well defined and very powerful way for addressing elements in an XML document. If the HTML markup of the page is well-formed we can treat it as XML document and use XPATH query to select an element. So we introduced a new attribute to address such elements called ":xpath".
Will explain the usage of XPATH with examples for each of the above problem.
Problem1: Accessing elements using attributes that are not pre-defined:
Suppose you have an HTML "select" element like:
<select foo="bar"> <option value="1">1< /option> < /select>
Now "foo" is not standard attribute but browser will simply ignore it. Now if you want to access this element you need to use XPATH query. So to access element the statement will look like:
element = browser.select(:xpath, "//select[@foo='bar']")
The above statement will return you the desired element.
Problem2: Accessing elements for which there is no class in WATiR:
Suppose you have an HTML "map" element on your page. Now for "map" element there is no class in WATiR which you can use to access the elements. For such elements you can use the function "element_by_xpath" which takes in "XPATH query" and return you the desired element.
Example:
Suppose you have a "map" like this:
< map name="top_menu_map" id="top_menu_map">
< area shape="rect" coords="18,2,62,17" ref="http://engin.com.au/public/index.htm" target="_self" alt="engin home"> < /area >
< /map>
Now you want to access "area" element. You can do it using the function described above. So to access element the statement will look like:
browser.element_by_xpath("//area[contains(@href , 'signup.htm')]").click()
Problem3: Accessing elements with respect to other elements:
Suppose you need to access an element(which doesn't have any fix attribute) based on position of some other element(which has a fix attribute). WATiR doesn't provide any direct way to access element based on position of other element. So what you can do is:
1. Go to the element which is fixed using WATiR classes. Then, traverse the DOM tree using the underlying "ole_object" for that element.
OR
2. Supply an XPATH query that selects the element based on the position of other element.
Example:
Suppose you have an HTML like this:
<table>
<tr>
<td> <img src="1.jpg"> <input type="button"> < /td>
<td> <img src="2.jpg"> <input type="button"> < /td>
<td> <img src="3.jpg"> <input type="button"> < /td>
<td> <img src="4.jpg"> <input type="button"> < /td>
< /tr>
<tr>
<td> <img src="5.jpg"> <input type="button"> < /td>
<td> <img src="6.jpg"> <input type="button"> < /td>
<td> <img src="7.jpg"> <input type="button"> < /td>
<td> <img src="8.jpg"> <input type="button"> < /td>
< /tr>
< /table>
Now suppose you want to click on button that has image with src="7.jpg" in front of it. So you have two ways to do it:
1. First find out the table using :index attribute which is always dangerous because page structure may change. Then iterate over rows and then cells to find which cell contains that image. Then in that cell find the button and then click it.
OR
2. You can give an "XPATH " query to select the element. So your statement will look like this:
browser.button(:xpath, "//img[@src='7.jpg']/input").click()
Problems with XPATH:
The only problem with XPATH is that its a bit slower while selecting the elements on the page. We are working on improving the time it takes to select the element.
So to summarize, using XPATH query you get extreme powerful selection mechanism which will allow you select those elements also that are other wise difficult to select using WATiR native selection mechanism.
Now, there were few things that were lacking:
1. What if you have a element which you can't access using those pre-defined attributes?
2. What if there is no API for a particular HTML element?
3. What if you want to access some element depeding upon some other element? For e.g.: Accessing which has a image with some pre-defined "src" attribute.
The solution to all above problems is using XPATH to access these elements. XPATH query is a well defined and very powerful way for addressing elements in an XML document. If the HTML markup of the page is well-formed we can treat it as XML document and use XPATH query to select an element. So we introduced a new attribute to address such elements called ":xpath".
Will explain the usage of XPATH with examples for each of the above problem.
Problem1: Accessing elements using attributes that are not pre-defined:
Suppose you have an HTML "select" element like:
<select foo="bar"> <option value="1">1< /option> < /select>
Now "foo" is not standard attribute but browser will simply ignore it. Now if you want to access this element you need to use XPATH query. So to access element the statement will look like:
element = browser.select(:xpath, "//select[@foo='bar']")
The above statement will return you the desired element.
Problem2: Accessing elements for which there is no class in WATiR:
Suppose you have an HTML "map" element on your page. Now for "map" element there is no class in WATiR which you can use to access the elements. For such elements you can use the function "element_by_xpath" which takes in "XPATH query" and return you the desired element.
Example:
Suppose you have a "map" like this:
< map name="top_menu_map" id="top_menu_map">
< area shape="rect" coords="18,2,62,17" ref="http://engin.com.au/public/index.htm" target="_self" alt="engin home"> < /area >
< /map>
Now you want to access "area" element. You can do it using the function described above. So to access element the statement will look like:
browser.element_by_xpath("//area[contains(@href , 'signup.htm')]").click()
Problem3: Accessing elements with respect to other elements:
Suppose you need to access an element(which doesn't have any fix attribute) based on position of some other element(which has a fix attribute). WATiR doesn't provide any direct way to access element based on position of other element. So what you can do is:
1. Go to the element which is fixed using WATiR classes. Then, traverse the DOM tree using the underlying "ole_object" for that element.
OR
2. Supply an XPATH query that selects the element based on the position of other element.
Example:
Suppose you have an HTML like this:
<table>
<tr>
<td> <img src="1.jpg"> <input type="button"> < /td>
<td> <img src="2.jpg"> <input type="button"> < /td>
<td> <img src="3.jpg"> <input type="button"> < /td>
<td> <img src="4.jpg"> <input type="button"> < /td>
< /tr>
<tr>
<td> <img src="5.jpg"> <input type="button"> < /td>
<td> <img src="6.jpg"> <input type="button"> < /td>
<td> <img src="7.jpg"> <input type="button"> < /td>
<td> <img src="8.jpg"> <input type="button"> < /td>
< /tr>
< /table>
Now suppose you want to click on button that has image with src="7.jpg" in front of it. So you have two ways to do it:
1. First find out the table using :index attribute which is always dangerous because page structure may change. Then iterate over rows and then cells to find which cell contains that image. Then in that cell find the button and then click it.
OR
2. You can give an "XPATH " query to select the element. So your statement will look like this:
browser.button(:xpath, "//img[@src='7.jpg']/input").click()
Problems with XPATH:
The only problem with XPATH is that its a bit slower while selecting the elements on the page. We are working on improving the time it takes to select the element.
So to summarize, using XPATH query you get extreme powerful selection mechanism which will allow you select those elements also that are other wise difficult to select using WATiR native selection mechanism.
Sunday, June 04, 2006
barCamp Pune
barCamp is a conference organized by the group of attendees. Its a open event where one is encouraged to give session or demos on any idea he/she is having.
After attending the barCamp at Delhi on 4th March 2006, I really found the above statement true. The theme was "Next Generation Web Application" but there were sessions on different topics including web 2.0, blogging, Information gathering, Ruby on Rails etc. I presented a session on 'Web Application Testing using Ruby' i.e. "WATiR" an open source Web Application testing tool written using Ruby language.
Now, barCamp is coming to Pune. After the success of barCamp at Delhi I am all set to attend this barCamp and presenting a session on "WATiR" here also.
After attending the barCamp at Delhi on 4th March 2006, I really found the above statement true. The theme was "Next Generation Web Application" but there were sessions on different topics including web 2.0, blogging, Information gathering, Ruby on Rails etc. I presented a session on 'Web Application Testing using Ruby' i.e. "WATiR" an open source Web Application testing tool written using Ruby language.
Now, barCamp is coming to Pune. After the success of barCamp at Delhi I am all set to attend this barCamp and presenting a session on "WATiR" here also.
Subscribe to:
Posts (Atom)